将 Crate 发布到 Crates.io
Publishing a Crate to Crates.io
我们已经使用过来自 crates.io 的包作为项目的依赖,但你也可以通过发布自己的包来与其他程序分享你的代码。位于 crates.io 的 crate 注册中心会分发你的包的源代码,因此它主要托管开源代码。
We’ve used packages from crates.io as dependencies of our project, but you can also share your code with other people by publishing your own packages. The crate registry at crates.io distributes the source code of your packages, so it primarily hosts code that is open source.
Rust 和 Cargo 提供了一些特性,使你发布的包更容易被人们找到和使用。接下来我们将讨论其中的一些特性,然后解释如何发布一个包。
Rust and Cargo have features that make your published package easier for people to find and use. We’ll talk about some of these features next and then explain how to publish a package.
编写有用的文档注释
Making Useful Documentation Comments
准确地为你的包编写文档将有助于其他用户了解如何以及何时使用它们,因此值得投入时间编写文档。在第 3 章中,我们讨论了如何使用双斜杠 // 来注释 Rust 代码。Rust 还有一种特殊的文档注释,为了方便起见,它被称为 文档注释(documentation comment),可以生成 HTML 文档。HTML 文档会显示文档注释的内容,供那些想知道如何 使用 你的 crate 而不是你的 crate 如何 实现 的程序员查看。
Accurately documenting your packages will help other users know how and when to
use them, so it’s worth investing the time to write documentation. In Chapter
3, we discussed how to comment Rust code using two slashes, //. Rust also has
a particular kind of comment for documentation, known conveniently as a
documentation comment, that will generate HTML documentation. The HTML
displays the contents of documentation comments for public API items intended
for programmers interested in knowing how to use your crate as opposed to how
your crate is implemented.
文档注释使用三斜杠 /// 而不是双斜杠,并支持 Markdown 语法来格式化文本。将文档注释紧贴在被说明的项目之前。示例 14-1 展示了名为 my_crate 的 crate 中 add_one 函数的文档注释。
Documentation comments use three slashes, ///, instead of two and support
Markdown notation for formatting the text. Place documentation comments just
before the item they’re documenting. Listing 14-1 shows documentation comments
for an add_one function in a crate named my_crate.
/// Adds one to the number given.
///
/// # Examples
///
/// ```
/// let arg = 5;
/// let answer = my_crate::add_one(arg);
///
/// assert_eq!(6, answer);
/// ```
pub fn add_one(x: i32) -> i32 {
    x + 1
}
在这里,我们描述了 add_one 函数的功能,以 Examples 标题开始一个章节,然后提供演示如何使用 add_one 函数的代码。我们可以通过运行 cargo doc 从该文档注释生成 HTML 文档。此命令运行随 Rust 分发的 rustdoc 工具,并将生成的 HTML 文档放在 target/doc 目录中。
Here, we give a description of what the add_one function does, start a
section with the heading Examples, and then provide code that demonstrates
how to use the add_one function. We can generate the HTML documentation from
this documentation comment by running cargo doc. This command runs the
rustdoc tool distributed with Rust and puts the generated HTML documentation
in the target/doc directory.
为了方便起见,运行 cargo doc --open 将为当前 crate 的文档(以及所有依赖项的文档)构建 HTML,并在 Web 浏览器中打开结果。导航到 add_one 函数,你将看到文档注释中的文本是如何渲染的,如图 14-1 所示。
For convenience, running cargo doc --open will build the HTML for your
current crate’s documentation (as well as the documentation for all of your
crate’s dependencies) and open the result in a web browser. Navigate to the
add_one function and you’ll see how the text in the documentation comments is
rendered, as shown in Figure 14-1.
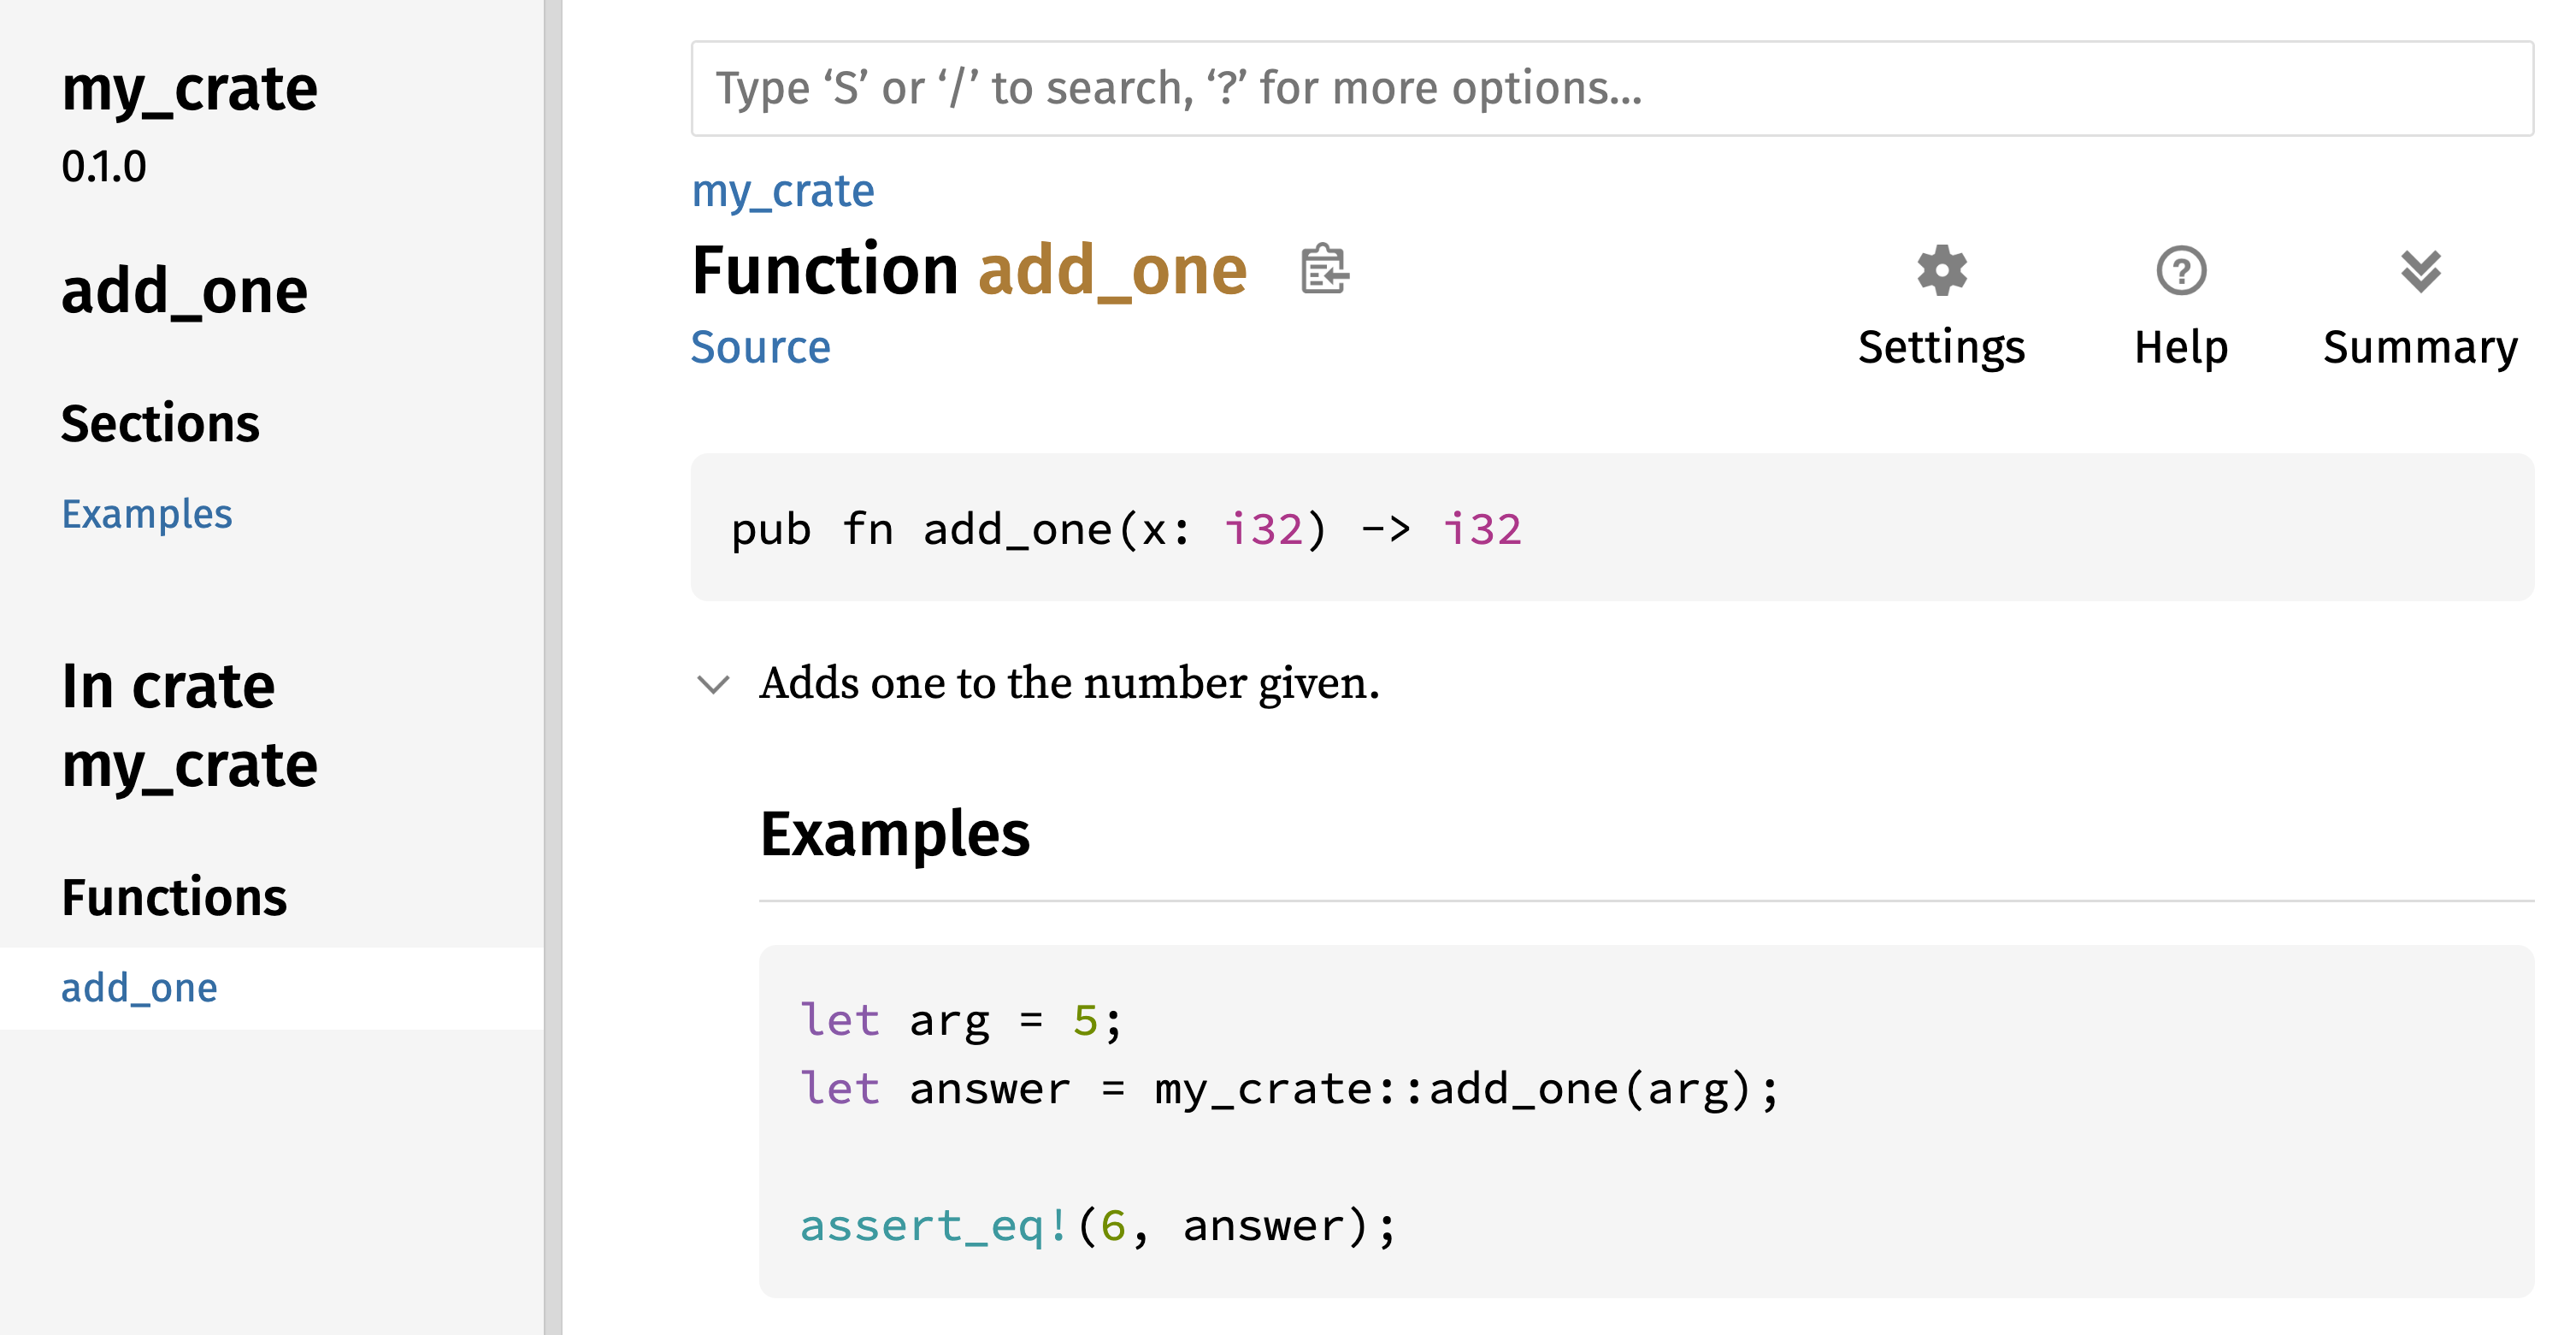
图 14-1:add_one 函数的 HTML 文档
Figure 14-1: The HTML documentation for the add_one
function
常用章节
Commonly Used Sections
我们在示例 14-1 中使用了 # Examples Markdown 标题,在 HTML 中创建了一个名为“Examples”的章节。以下是 crate 作者在文档中常用的一些其他章节:
We used the # Examples Markdown heading in Listing 14-1 to create a section
in the HTML with the title “Examples.” Here are some other sections that crate
authors commonly use in their documentation:
-
Panics:文档化函数可能发生 panic 的场景。不希望程序发生 panic 的函数调用者应确保不在这些情况下调用该函数。
-
Panics: These are the scenarios in which the function being documented could panic. Callers of the function who don’t want their programs to panic should make sure they don’t call the function in these situations.
-
Errors:如果函数返回
Result,描述可能发生的错误种类以及导致返回这些错误的条件,可以帮助调用者编写代码以不同的方式处理不同类型的错误。 -
Errors: If the function returns a
Result, describing the kinds of errors that might occur and what conditions might cause those errors to be returned can be helpful to callers so that they can write code to handle the different kinds of errors in different ways. -
Safety:如果调用函数是
unsafe的(我们将在第 20 章讨论不安全性),则应包含一个章节解释为什么该函数是不安全的,并涵盖函数期望调用者遵守的固定规则(invariants)。 -
Safety: If the function is
unsafeto call (we discuss unsafety in Chapter 20), there should be a section explaining why the function is unsafe and covering the invariants that the function expects callers to uphold.
大多数文档注释不需要包含所有这些章节,但这是一个很好的清单,可以提醒你用户感兴趣的关于代码的各个方面。
Most documentation comments don’t need all of these sections, but this is a good checklist to remind you of the aspects of your code users will be interested in knowing about.
文档注释作为测试
Documentation Comments as Tests
在文档注释中添加示例代码块不仅可以演示如何使用你的库,还有一个额外的好处:运行 cargo test 会将文档中的代码示例作为测试运行!没有什么比带示例的文档更好的了。但也没有什么比因代码在文档编写后发生变更而导致示例失效更糟糕的了。如果我们对示例 14-1 中 add_one 函数的文档运行 cargo test,我们将在测试结果中看到如下章节:
Adding example code blocks in your documentation comments can help demonstrate
how to use your library and has an additional bonus: Running cargo test will
run the code examples in your documentation as tests! Nothing is better than
documentation with examples. But nothing is worse than examples that don’t work
because the code has changed since the documentation was written. If we run
cargo test with the documentation for the add_one function from Listing
14-1, we will see a section in the test results that looks like this:
   Doc-tests my_crate

running 1 test
test src/lib.rs - add_one (line 5) ... ok

test result: ok. 1 passed; 0 failed; 0 ignored; 0 measured; 0 filtered out; finished in 0.27s
现在,如果我们更改函数或示例,使示例中的 assert_eq! 发生 panic,并再次运行 cargo test,我们将看到文档测试捕获到了示例与代码不一致的情况!
Now, if we change either the function or the example so that the assert_eq!
in the example panics, and run cargo test again, we’ll see that the doc tests
catch that the example and the code are out of sync with each other!
包含项注释
Contained Item Comments
文档注释风格 //! 会为 包含 注释的项目添加文档,而不是为注释 之后 的项目添加文档。我们通常在 crate 根文件(按惯例是 src/lib.rs)或模块内部使用这些文档注释,来为整个 crate 或模块编写说明。
The style of doc comment //! adds documentation to the item that contains
the comments rather than to the items following the comments. We typically
use these doc comments inside the crate root file (src/lib.rs by convention)
or inside a module to document the crate or the module as a whole.
例如,要添加描述包含 add_one 函数的 my_crate 目的的文档,我们将以 //! 开头的文档注释添加到 src/lib.rs 文件的开头,如示例 14-2 所示。
For example, to add documentation that describes the purpose of the my_crate
crate that contains the add_one function, we add documentation comments that
start with //! to the beginning of the src/lib.rs file, as shown in Listing
14-2.
//! # My Crate
//!
//! `my_crate` is a collection of utilities to make performing certain
//! calculations more convenient.

/// Adds one to the number given.
// --snip--
///
/// # Examples
///
/// ```
/// let arg = 5;
/// let answer = my_crate::add_one(arg);
///
/// assert_eq!(6, answer);
/// ```
pub fn add_one(x: i32) -> i32 {
    x + 1
}
注意最后一行以 //! 开头的内容之后没有任何代码。因为我们以 //! 而不是 /// 开始注释,所以我们是在记录包含此注释的项目,而不是此注释之后的项目。在这种情况下,该项目是 src/lib.rs 文件,也就是 crate 根。这些注释描述了整个 crate。
Notice there isn’t any code after the last line that begins with //!. Because
we started the comments with //! instead of ///, we’re documenting the item
that contains this comment rather than an item that follows this comment. In
this case, that item is the src/lib.rs file, which is the crate root. These
comments describe the entire crate.
当我们运行 cargo doc --open 时,这些注释将显示在 my_crate 文档首页的公共项目列表上方,如图 14-2 所示。
When we run cargo doc --open, these comments will display on the front page
of the documentation for my_crate above the list of public items in the
crate, as shown in Figure 14-2.
项目内部的文档注释对于描述 crate 和模块特别有用。使用它们来解释容器的整体目的,以帮助用户理解 crate 的组织结构。
Documentation comments within items are useful for describing crates and modules especially. Use them to explain the overall purpose of the container to help your users understand the crate’s organization.
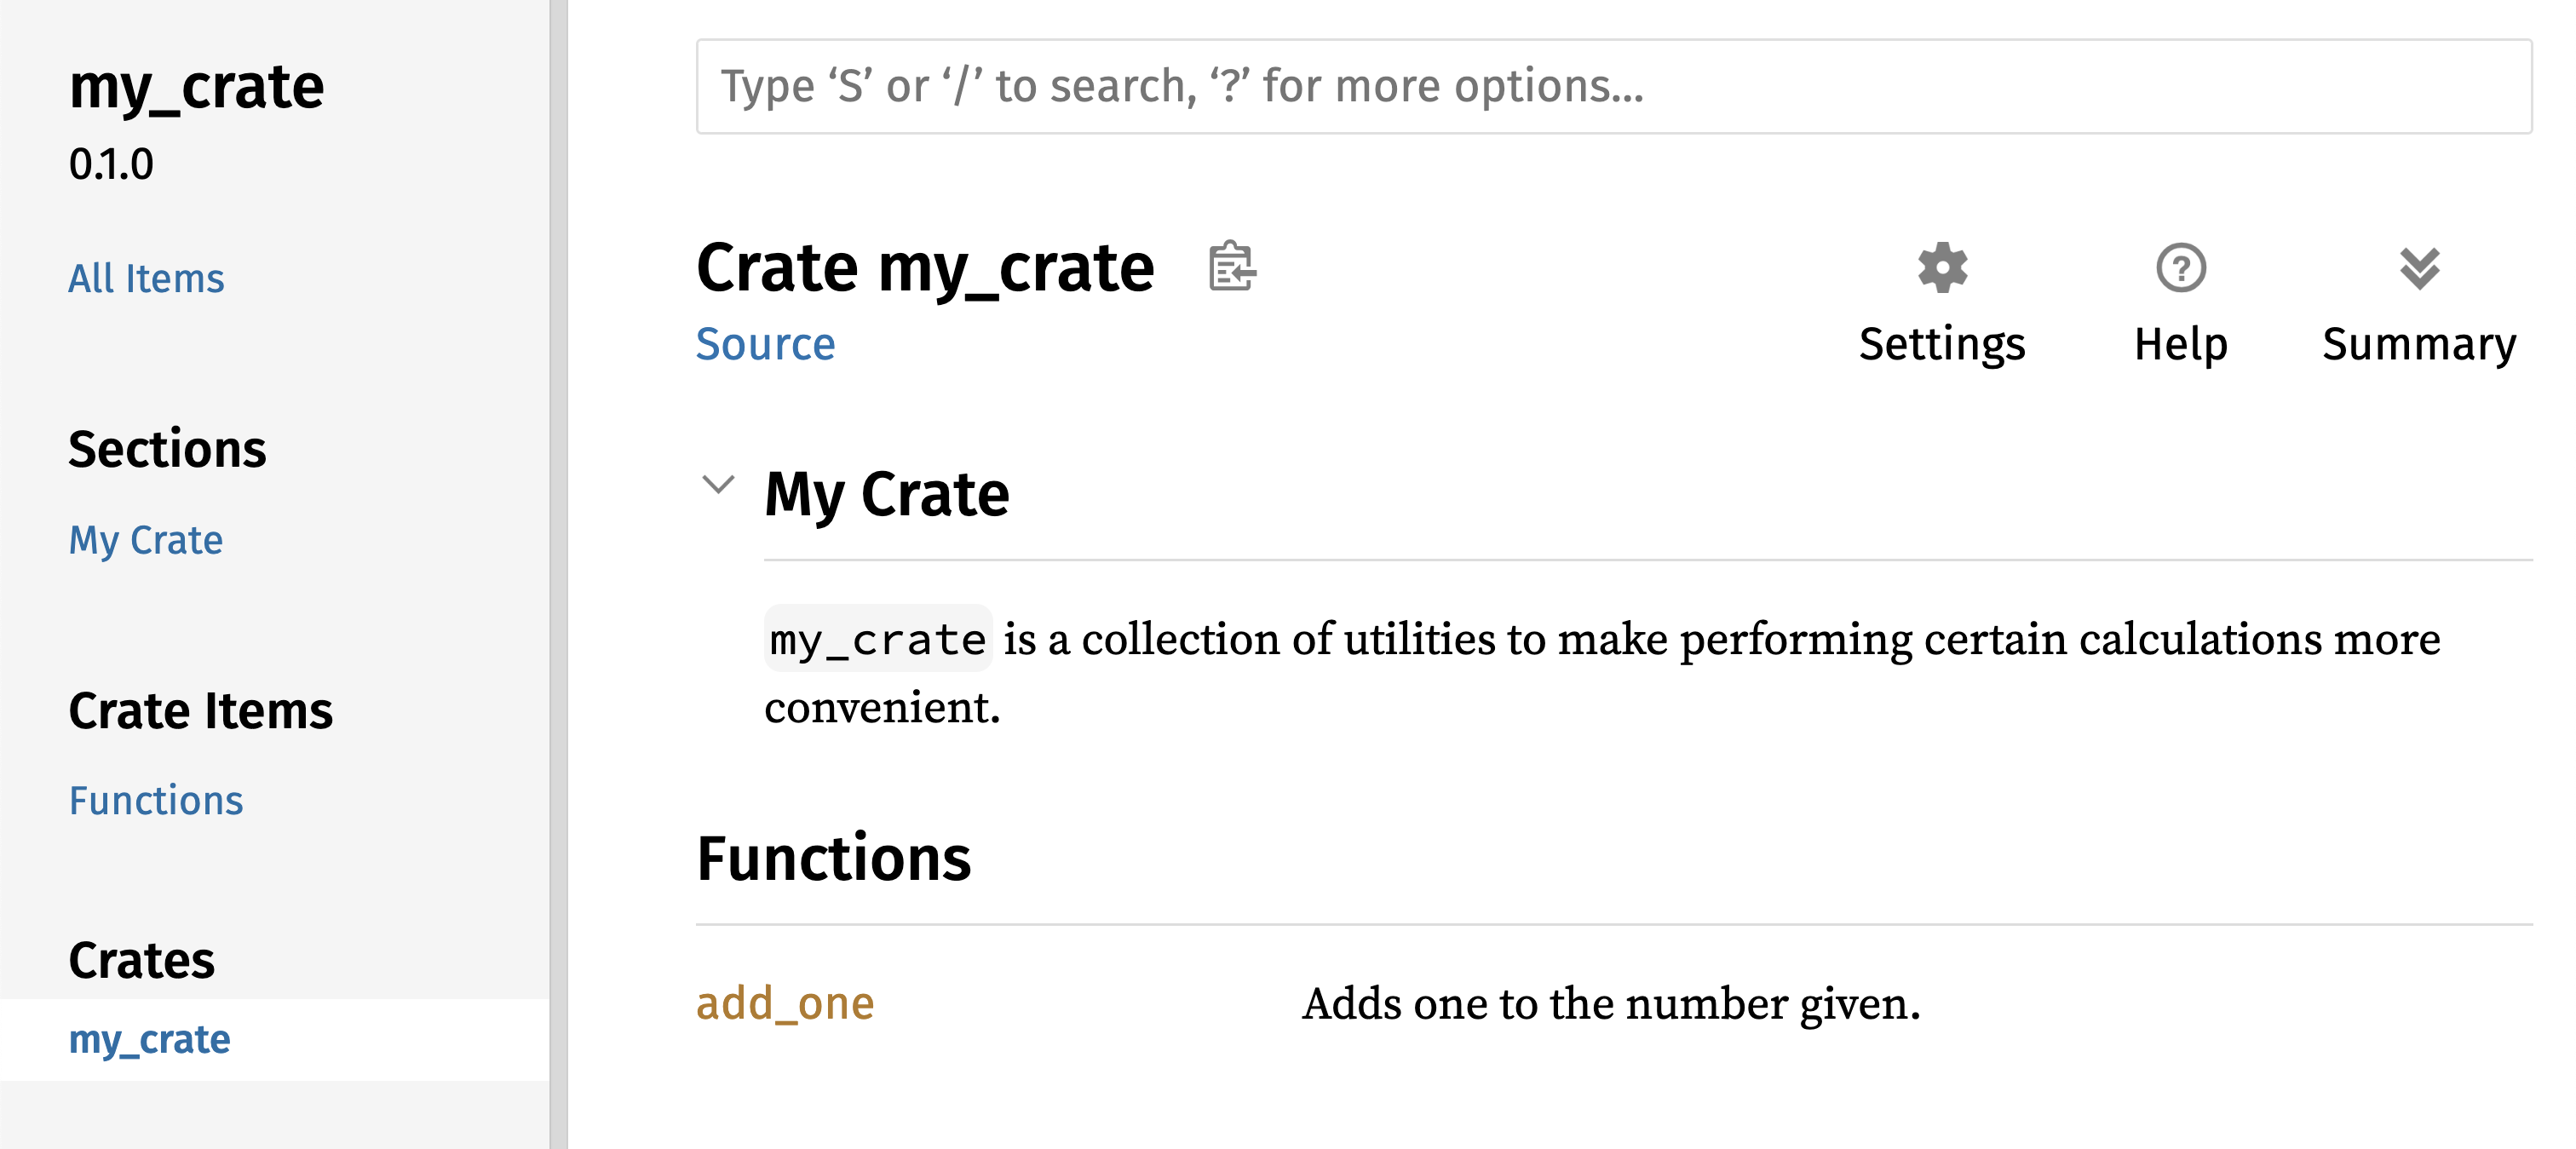
图 14-2:my_crate 的渲染文档,包括描述整个 crate 的注释
Figure 14-2: The rendered documentation for my_crate,
including the comment describing the crate as a whole
导出便捷的公共 API
Exporting a Convenient Public API
发布 crate 时,公共 API 的结构是一个重要的考虑因素。使用你的 crate 的人不如你熟悉它的结构,如果你的 crate 有庞大的模块层级,他们可能难以找到想要使用的部分。
The structure of your public API is a major consideration when publishing a crate. People who use your crate are less familiar with the structure than you are and might have difficulty finding the pieces they want to use if your crate has a large module hierarchy.
在第 7 章中,我们介绍了如何使用 pub 关键字将项设为公开,以及如何使用 use 关键字将项引入作用域。然而,你在开发 crate 时认为合理的结构对于用户来说可能并不方便。你可能希望按层级组织结构体,但想要使用深埋在层级中的类型的用户可能会难以发现该类型的存在。他们也可能对不得不输入 use my_crate::some_module::another_module::UsefulType; 而不是 use my_crate::UsefulType; 感到厌烦。
In Chapter 7, we covered how to make items public using the pub keyword, and
how to bring items into a scope with the use keyword. However, the structure
that makes sense to you while you’re developing a crate might not be very
convenient for your users. You might want to organize your structs in a
hierarchy containing multiple levels, but then people who want to use a type
you’ve defined deep in the hierarchy might have trouble finding out that type
exists. They might also be annoyed at having to enter use my_crate::some_module::another_module::UsefulType; rather than use my_crate::UsefulType;.
好消息是,如果这种结构对于其他库的使用者来说 并不 方便,你不需要重新安排内部组织结构:相反,你可以使用 pub use 重新导出(re-export)项,以创建一个与内部私有结构不同的公共结构。重新导出 会获取一个位置的公共项,并将其在另一个位置公开,就好像它是在另一个位置定义的一样。
The good news is that if the structure isn’t convenient for others to use
from another library, you don’t have to rearrange your internal organization:
Instead, you can re-export items to make a public structure that’s different
from your private structure by using pub use. Re-exporting takes a public
item in one location and makes it public in another location, as if it were
defined in the other location instead.
例如,假设我们创建了一个名为 art 的库,用于模拟艺术概念。该库包含两个模块:包含两个枚举 PrimaryColor 和 SecondaryColor 的 kinds 模块,以及包含 mix 函数的 utils 模块,如示例 14-3 所示。
For example, say we made a library named art for modeling artistic concepts.
Within this library are two modules: a kinds module containing two enums
named PrimaryColor and SecondaryColor and a utils module containing a
function named mix, as shown in Listing 14-3.
//! # Art
//!
//! A library for modeling artistic concepts.

pub mod kinds {
    /// The primary colors according to the RYB color model.
    pub enum PrimaryColor {
        Red,
        Yellow,
        Blue,
    }

    /// The secondary colors according to the RYB color model.
    pub enum SecondaryColor {
        Orange,
        Green,
        Purple,
    }
}

pub mod utils {
    use crate::kinds::*;

    /// Combines two primary colors in equal amounts to create
    /// a secondary color.
    pub fn mix(c1: PrimaryColor, c2: PrimaryColor) -> SecondaryColor {
        // --snip--
        unimplemented!();
    }
}
图 14-3 展示了由 cargo doc 生成的该 crate 文档首页的样子。
Figure 14-3 shows what the front page of the documentation for this crate
generated by cargo doc would look like.
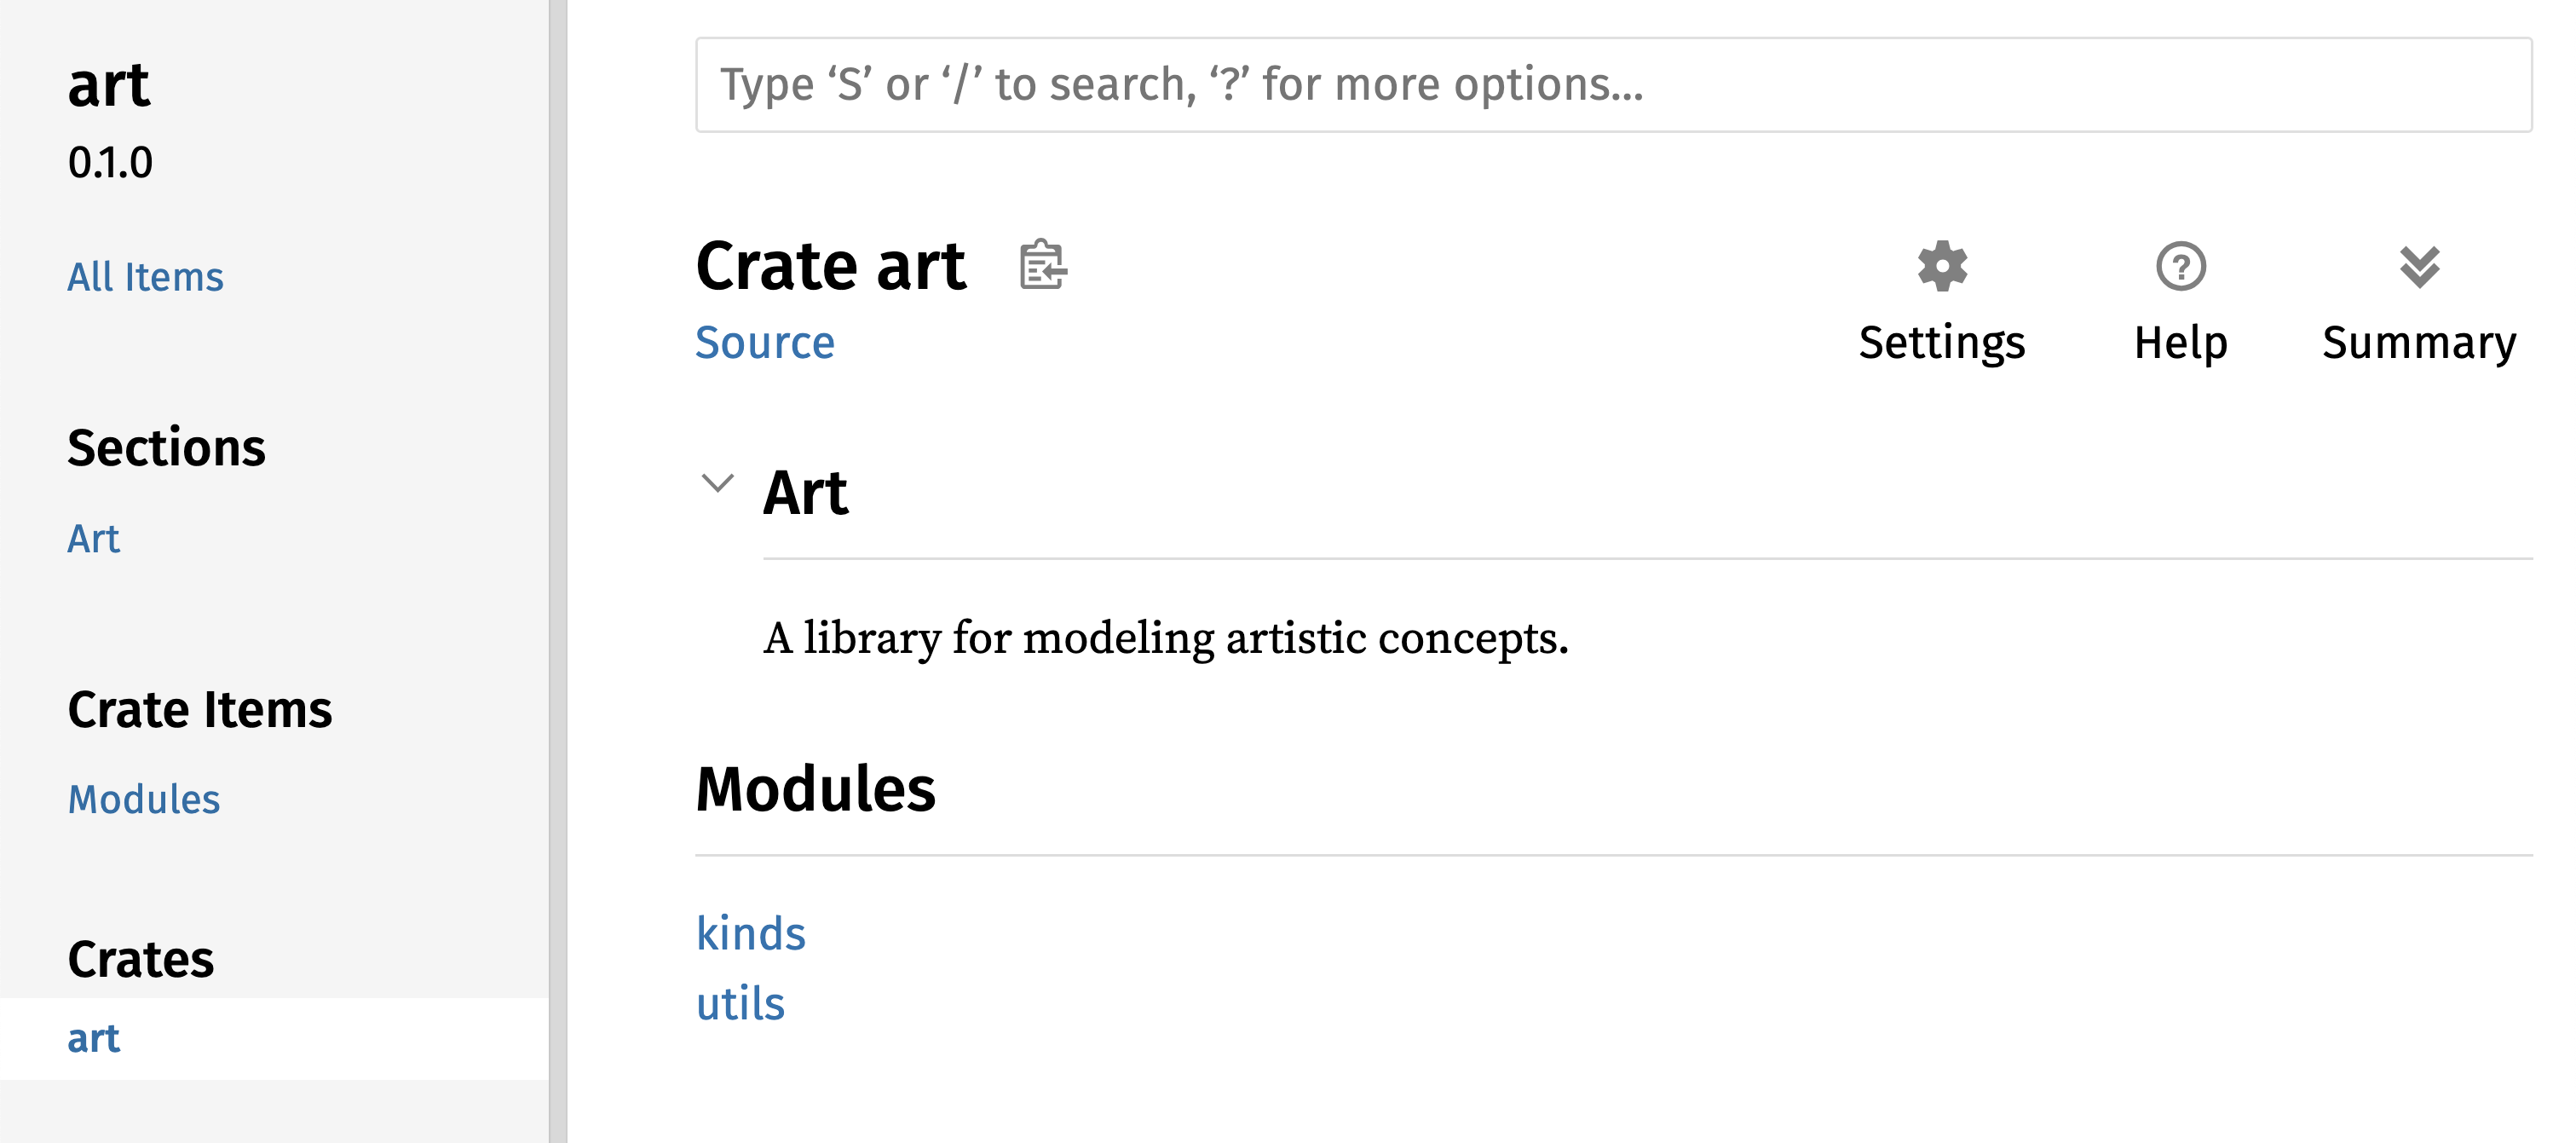
图 14-3:art 文档首页,列出了 kinds 和 utils 模块
Figure 14-3: The front page of the documentation for art
that lists the kinds and utils modules
注意 PrimaryColor 和 SecondaryColor 类型没有列在首页,mix 函数也没有。我们必须点击 kinds 和 utils 才能看到它们。
Note that the PrimaryColor and SecondaryColor types aren’t listed on the
front page, nor is the mix function. We have to click kinds and utils to
see them.
另一个依赖此库的 crate 需要使用 use 语句将 art 中的项引入作用域,并指定当前定义的模块结构。示例 14-4 展示了一个使用 art crate 中的 PrimaryColor 和 mix 项的 crate 示例。
Another crate that depends on this library would need use statements that
bring the items from art into scope, specifying the module structure that’s
currently defined. Listing 14-4 shows an example of a crate that uses the
PrimaryColor and mix items from the art crate.
use art::kinds::PrimaryColor;
use art::utils::mix;

fn main() {
    let red = PrimaryColor::Red;
    let yellow = PrimaryColor::Yellow;
    mix(red, yellow);
}
示例 14-4 中代码的作者(使用了 art crate)不得不弄清楚 PrimaryColor 在 kinds 模块中,而 mix 在 utils 模块中。art crate 的模块结构对于开发 art crate 的人比使用它的人更有意义。对于试图了解如何使用 art crate 的人来说,内部结构不包含任何有用信息,反而会造成混淆,因为开发者必须弄清楚去哪里寻找,并且必须在 use 语句中指定模块名称。
The author of the code in Listing 14-4, which uses the art crate, had to
figure out that PrimaryColor is in the kinds module and mix is in the
utils module. The module structure of the art crate is more relevant to
developers working on the art crate than to those using it. The internal
structure doesn’t contain any useful information for someone trying to
understand how to use the art crate, but rather causes confusion because
developers who use it have to figure out where to look, and must specify the
module names in the use statements.
为了从公共 API 中移除内部组织结构,我们可以修改示例 14-3 中的 art crate 代码,添加 pub use 语句在顶层重新导出这些项,如示例 14-5 所示。
To remove the internal organization from the public API, we can modify the
art crate code in Listing 14-3 to add pub use statements to re-export the
items at the top level, as shown in Listing 14-5.
//! # Art
//!
//! A library for modeling artistic concepts.

pub use self::kinds::PrimaryColor;
pub use self::kinds::SecondaryColor;
pub use self::utils::mix;

pub mod kinds {
    // --snip--
    /// The primary colors according to the RYB color model.
    pub enum PrimaryColor {
        Red,
        Yellow,
        Blue,
    }

    /// The secondary colors according to the RYB color model.
    pub enum SecondaryColor {
        Orange,
        Green,
        Purple,
    }
}

pub mod utils {
    // --snip--
    use crate::kinds::*;

    /// Combines two primary colors in equal amounts to create
    /// a secondary color.
    pub fn mix(c1: PrimaryColor, c2: PrimaryColor) -> SecondaryColor {
        SecondaryColor::Orange
    }
}
cargo doc 为此 crate 生成的 API 文档现在将在首页列出并链接重新导出的内容,如图 14-4 所示,使得 PrimaryColor、SecondaryColor 类型和 mix 函数更容易被找到。
The API documentation that cargo doc generates for this crate will now list
and link re-exports on the front page, as shown in Figure 14-4, making the
PrimaryColor and SecondaryColor types and the mix function easier to find.
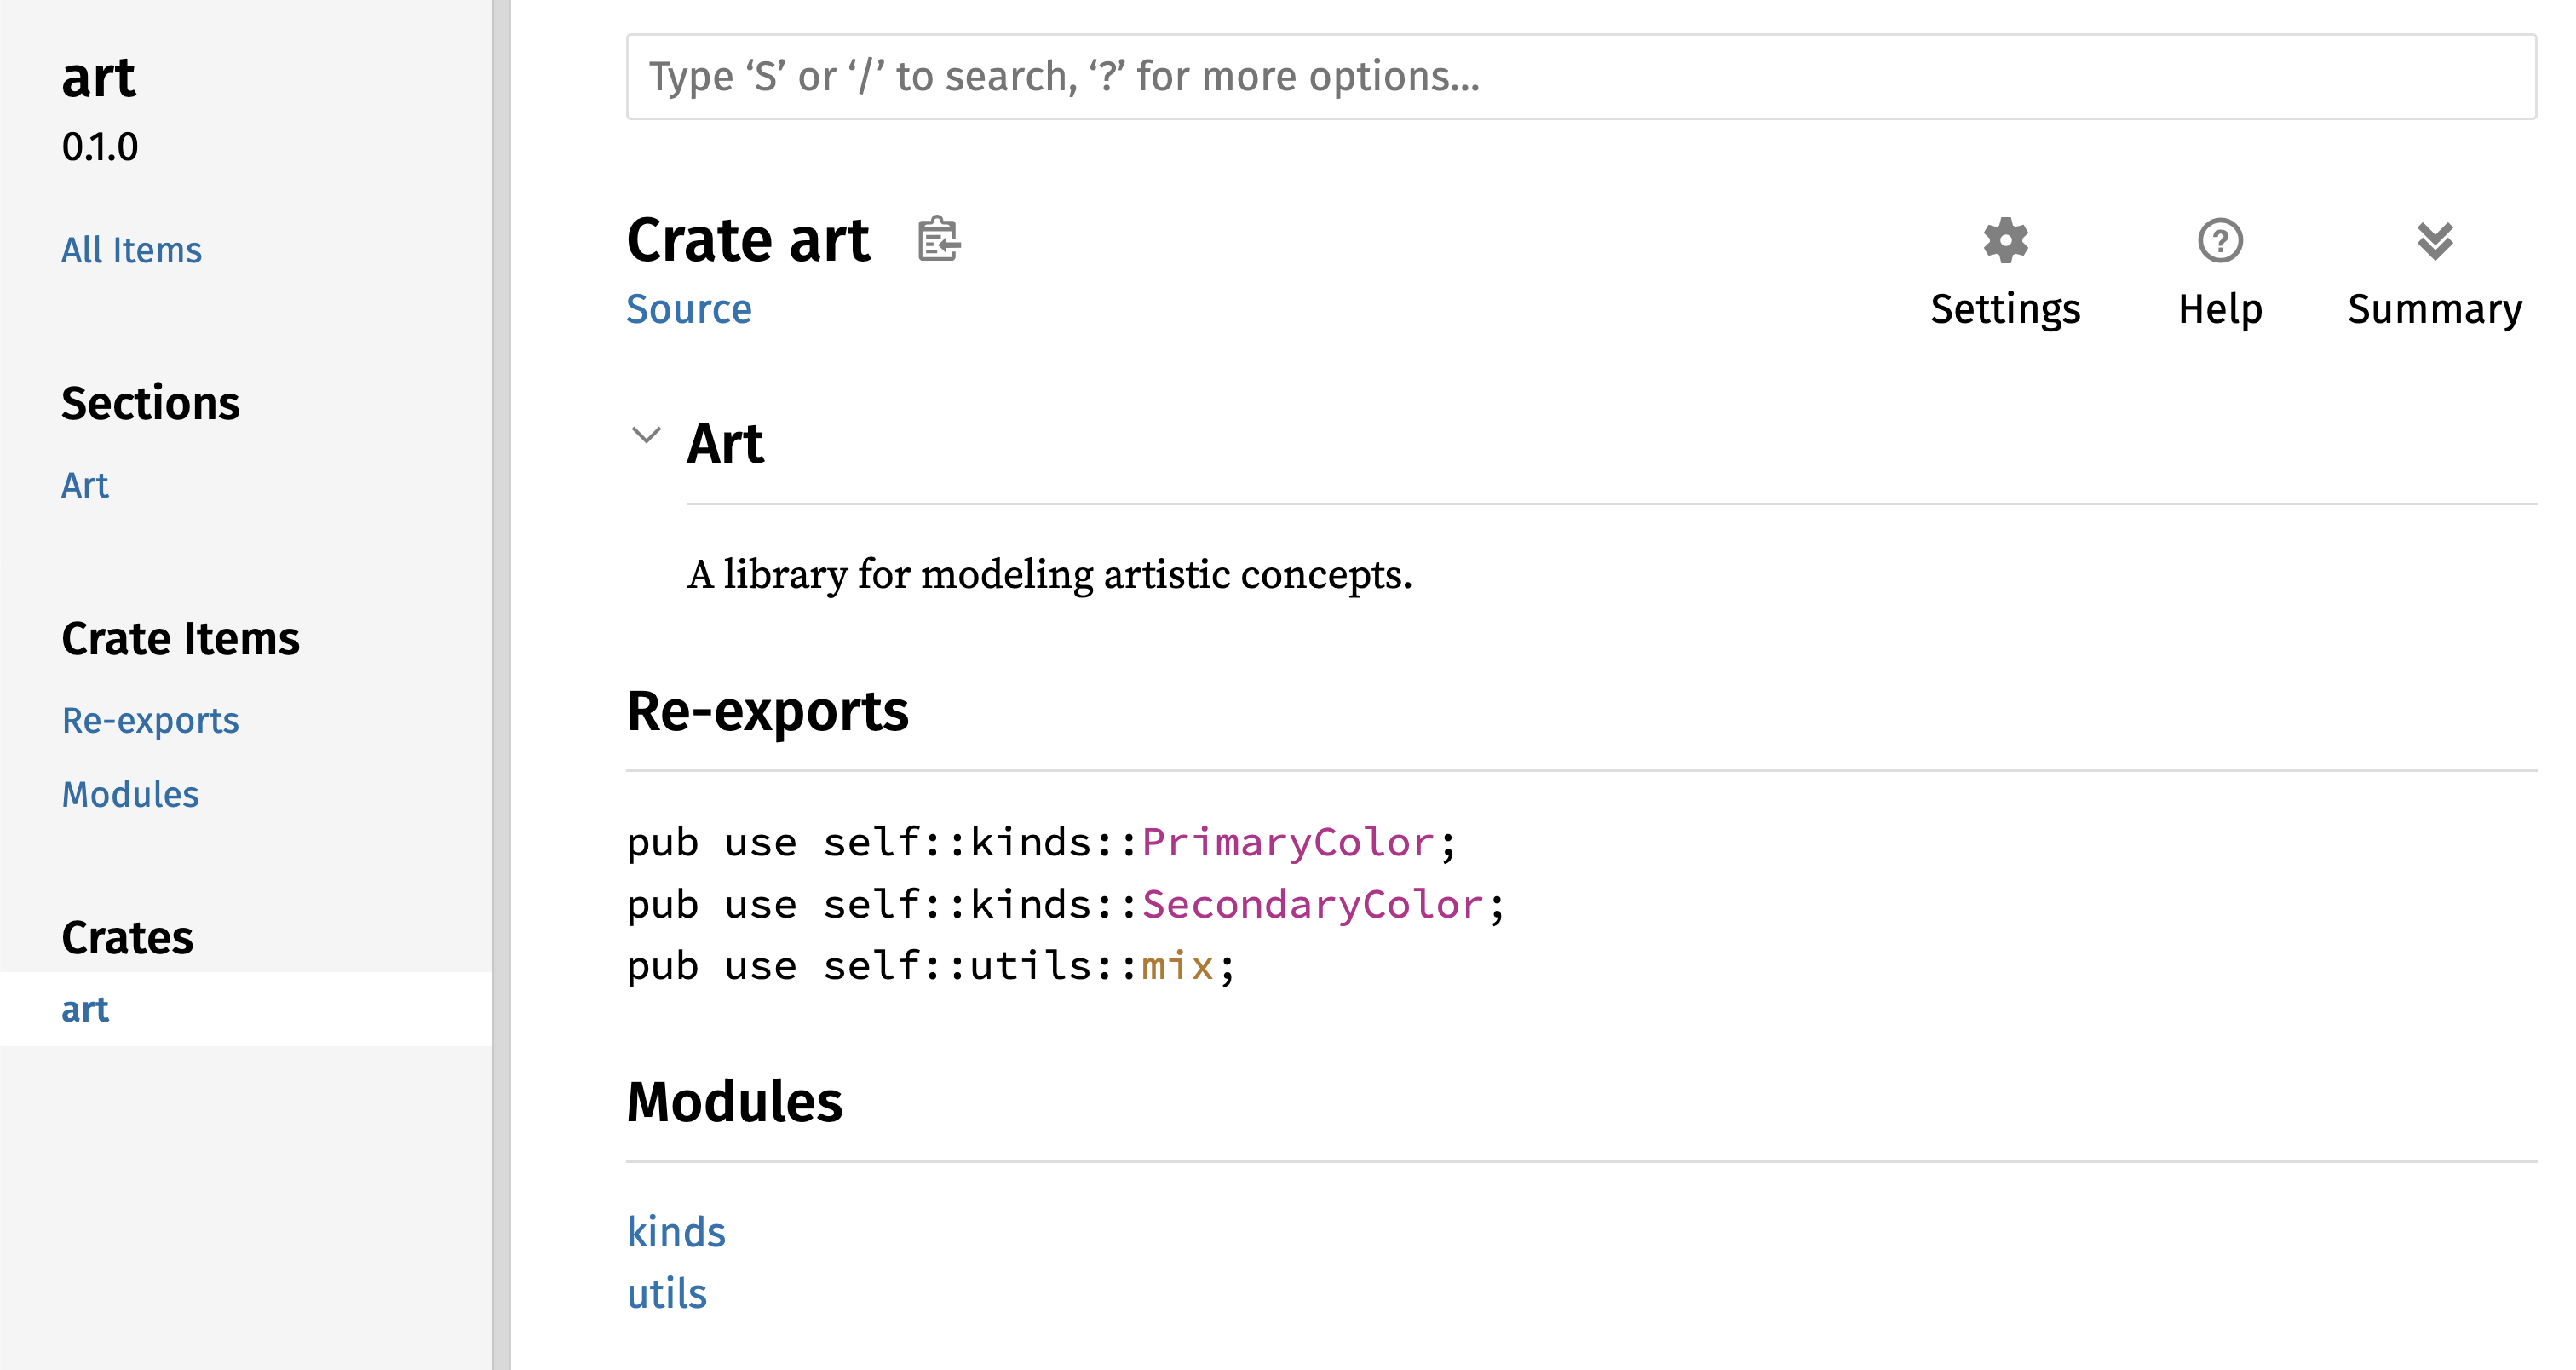
图 14-4:art 文档首页,列出了重新导出的项
Figure 14-4: The front page of the documentation for art
that lists the re-exports
art crate 的用户仍然可以像示例 14-4 中演示的那样查看和使用示例 14-3 中的内部结构,或者他们可以使用示例 14-5 中更方便的结构,如示例 14-6 所示。
The art crate users can still see and use the internal structure from Listing
14-3 as demonstrated in Listing 14-4, or they can use the more convenient
structure in Listing 14-5, as shown in Listing 14-6.
use art::PrimaryColor;
use art::mix;

fn main() {
    // --snip--
    let red = PrimaryColor::Red;
    let yellow = PrimaryColor::Yellow;
    mix(red, yellow);
}
在有许多嵌套模块的情况下,使用 pub use 在顶层重新导出类型可以显著改善使用该 crate 的体验。pub use 的另一个常见用途是在当前 crate 中重新导出依赖项的定义,使该 crate 的定义成为你 crate 公共 API 的一部分。
In cases where there are many nested modules, re-exporting the types at the top
level with pub use can make a significant difference in the experience of
people who use the crate. Another common use of pub use is to re-export
definitions of a dependency in the current crate to make that crate’s
definitions part of your crate’s public API.
创建一个有用的公共 API 结构与其说是一门科学,不如说是一门艺术,你可以通过不断迭代来找到最适合用户的 API。选择 pub use 让你在内部构建 crate 时具有灵活性,并将内部结构与呈现给用户的内容解耦。看看你安装的一些 crate 的代码,看看它们的内部结构是否与其公共 API 不同。
Creating a useful public API structure is more an art than a science, and you
can iterate to find the API that works best for your users. Choosing pub use
gives you flexibility in how you structure your crate internally and decouples
that internal structure from what you present to your users. Look at some of
the code of crates you’ve installed to see if their internal structure differs
from their public API.
设置 Crates.io 账号
Setting Up a Crates.io Account
在发布任何 crate 之前,你需要在 crates.io 上创建一个账号并获取一个 API 令牌。为此,请访问 crates.io 首页,通过 GitHub 账号登录。(GitHub 账号目前是必需的,但该网站未来可能会支持其他创建账号的方式。)登录后,访问你的账户设置页面 https://crates.io/me/ 并获取你的 API 密钥。然后,运行 cargo login 命令并在提示时粘贴你的 API 密钥,如下所示:
Before you can publish any crates, you need to create an account on
crates.io and get an API token. To do so,
visit the home page at crates.io and log
in via a GitHub account. (The GitHub account is currently a requirement, but
the site might support other ways of creating an account in the future.) Once
you’re logged in, visit your account settings at
https://crates.io/me/ and retrieve your
API key. Then, run the cargo login command and paste your API key when prompted, like this:
$ cargo login
abcdefghijklmnopqrstuvwxyz012345
此命令将告知 Cargo 你的 API 令牌,并将其本地存储在 ~/.cargo/credentials.toml 中。注意,此令牌是秘密信息:不要分享给任何人。如果你出于任何原因将其分享给了别人,你应该撤销它并在 crates.io 上生成一个新令牌。
This command will inform Cargo of your API token and store it locally in ~/.cargo/credentials.toml. Note that this token is a secret: Do not share it with anyone else. If you do share it with anyone for any reason, you should revoke it and generate a new token on crates.io.
为新 Crate 添加元数据
Adding Metadata to a New Crate
假设你有一个想要发布的 crate。在发布之前,你需要在 crate 的 Cargo.toml 文件的 [package] 部分添加一些元数据。
Let’s say you have a crate you want to publish. Before publishing, you’ll need
to add some metadata in the [package] section of the crate’s Cargo.toml
file.
你的 crate 需要一个唯一的名称。在本地开发时,你可以随意命名 crate。然而,crates.io 上的 crate 名称是先到先得的。一旦一个名称被占用,其他人就无法发布同名的 crate。在尝试发布 crate 之前,请搜索你想要使用的名称。如果该名称已被使用,你需要找另一个名称并修改 Cargo.toml 文件 [package] 部分下的 name 字段,如下所示:
Your crate will need a unique name. While you’re working on a crate locally,
you can name a crate whatever you’d like. However, crate names on
crates.io are allocated on a first-come,
first-served basis. Once a crate name is taken, no one else can publish a crate
with that name. Before attempting to publish a crate, search for the name you
want to use. If the name has been used, you will need to find another name and
edit the name field in the Cargo.toml file under the [package] section to
use the new name for publishing, like so:
文件名:Cargo.toml Filename: Cargo.toml
[package]
name = "guessing_game"
即使你选择了一个唯一的名称,如果此时运行 cargo publish 发布 crate,你会得到一个警告,然后是一个错误:
Even if you’ve chosen a unique name, when you run cargo publish to publish
the crate at this point, you’ll get a warning and then an error:
$ cargo publish
    Updating crates.io index
warning: manifest has no description, license, license-file, documentation, homepage or repository.
See https://doc.rust-lang.org/carhttps://doc.rust-lang.org/reference/manifest.html#package-metadata for more info.
--snip--
error: failed to publish to registry at https://crates.io

Caused by:
  the remote server responded with an error (status 400 Bad Request): missing or empty metadata fields: description, license. Please see https://doc.rust-lang.org/carhttps://doc.rust-lang.org/reference/manifest.html for more information on configuring these fields
这会导致错误,因为你缺少了一些关键信息:需要有描述(description)和许可证(license),以便人们知道你的 crate 是做什么的,以及可以在什么条款下使用它。在 Cargo.toml 中,添加一个只有一两句话的描述,因为它会随你的 crate 一起出现在搜索结果中。对于 license 字段,你需要提供一个 许可证标识符值。 Linux 基金会的 SPDX (Software Package Data Exchange) 列出了你可以使用的标识符。例如,要指定你使用 MIT 许可证授权你的 crate,请添加 MIT 标识符:
This results in an error because you’re missing some crucial information: A
description and license are required so that people will know what your crate
does and under what terms they can use it. In Cargo.toml, add a description
that’s just a sentence or two, because it will appear with your crate in search
results. For the license field, you need to give a license identifier
value. The Linux Foundation’s Software Package Data Exchange (SPDX)
lists the identifiers you can use for this value. For example, to specify that
you’ve licensed your crate using the MIT License, add the MIT identifier:
文件名:Cargo.toml Filename: Cargo.toml
[package]
name = "guessing_game"
license = "MIT"
如果你想使用 SPDX 中未出现的许可证,你需要将该许可证的文本放在一个文件中,将该文件包含在项目中,然后使用 license-file 指定该文件的名称,而不是使用 license 键。
If you want to use a license that doesn’t appear in the SPDX, you need to place
the text of that license in a file, include the file in your project, and then
use license-file to specify the name of that file instead of using the
license key.
关于哪种许可证适合你的项目超出了本书的范围。Rust 社区中的许多人使用与 Rust 相同的 MIT OR Apache-2.0 双重许可证授权他们的项目。这种做法展示了你也可以指定多个由 OR 分隔的许可证标识符,以便为你的项目提供多个许可证。
Guidance on which license is appropriate for your project is beyond the scope
of this book. Many people in the Rust community license their projects in the
same way as Rust by using a dual license of MIT OR Apache-2.0. This practice
demonstrates that you can also specify multiple license identifiers separated
by OR to have multiple licenses for your project.
添加了唯一的名称、版本、描述和许可证后,准备发布的项目的 Cargo.toml 文件可能看起来像这样:
With a unique name, the version, your description, and a license added, the Cargo.toml file for a project that is ready to publish might look like this:
文件名:Cargo.toml Filename: Cargo.toml
[package]
name = "guessing_game"
version = "0.1.0"
edition = "2024"
description = "A fun game where you guess what number the computer has chosen."
license = "MIT OR Apache-2.0"

[dependencies]
Cargo 的文档 描述了你可以指定的其他元数据,以确保其他人可以更轻松地发现和使用你的 crate。
Cargo’s documentation describes other metadata you can specify to ensure that others can discover and use your crate more easily.
发布到 Crates.io
Publishing to Crates.io
现在你已经创建了账号,保存了 API 令牌,为你的 crate 选择了名称,并指定了所需的元数据,你已经准备好发布了!发布 crate 会将特定版本上传到 crates.io 供他人使用。
Now that you’ve created an account, saved your API token, chosen a name for your crate, and specified the required metadata, you’re ready to publish! Publishing a crate uploads a specific version to crates.io for others to use.
请务必小心,因为发布是 永久性 的。该版本永远无法被覆盖,代码也无法被删除,除非在某些特殊情况下。Crates.io 的一个主要目标是充当代码的永久存档,以便所有依赖来自 crates.io 的 crate 的项目的构建能够继续工作。允许版本删除将使这一目标无法实现。然而,发布 crate 版本的数量没有限制。
Be careful, because a publish is permanent. The version can never be overwritten, and the code cannot be deleted except in certain circumstances. One major goal of Crates.io is to act as a permanent archive of code so that builds of all projects that depend on crates from crates.io will continue to work. Allowing version deletions would make fulfilling that goal impossible. However, there is no limit to the number of crate versions you can publish.
再次运行 cargo publish 命令。现在它应该成功了:
Run the cargo publish command again. It should succeed now:
$ cargo publish
    Updating crates.io index
   Packaging guessing_game v0.1.0 (file:///projects/guessing_game)
    Packaged 6 files, 1.2KiB (895.0B compressed)
   Verifying guessing_game v0.1.0 (file:///projects/guessing_game)
   Compiling guessing_game v0.1.0
(file:///projects/guessing_game/target/package/guessing_game-0.1.0)
    Finished `dev` profile [unoptimized + debuginfo] target(s) in 0.19s
   Uploading guessing_game v0.1.0 (file:///projects/guessing_game)
    Uploaded guessing_game v0.1.0 to registry `crates-io`
note: waiting for `guessing_game v0.1.0` to be available at registry
`crates-io`.
You may press ctrl-c to skip waiting; the crate should be available shortly.
   Published guessing_game v0.1.0 at registry `crates-io`
恭喜!你现在已经与 Rust 社区分享了你的代码,任何人都可以轻松地将你的 crate 作为其项目的依赖项。
Congratulations! You’ve now shared your code with the Rust community, and anyone can easily add your crate as a dependency of their project.
发布现有 Crate 的新版本
Publishing a New Version of an Existing Crate
当你对 crate 进行了修改并准备发布新版本时,你需要更改 Cargo.toml 文件中指定的 version 值并重新发布。根据你所做的修改类型,使用 语义化版本规则(Semantic Versioning rules) 来决定下一个合适的版本号。然后,运行 cargo publish 上传新版本。
When you’ve made changes to your crate and are ready to release a new version,
you change the version value specified in your Cargo.toml file and
republish. Use the Semantic Versioning rules to decide what an
appropriate next version number is, based on the kinds of changes you’ve made.
Then, run cargo publish to upload the new version.
从 Crates.io 撤回版本
Deprecating Versions from Crates.io
虽然你不能删除 crate 的旧版本,但你可以防止任何未来的项目将它们添加为新依赖项。当由于某种原因某个 crate 版本损坏时,这非常有用。在这种情况下,Cargo 支持 撤回(yank)一个 crate 版本。
Although you can’t remove previous versions of a crate, you can prevent any future projects from adding them as a new dependency. This is useful when a crate version is broken for one reason or another. In such situations, Cargo supports yanking a crate version.
撤回 一个版本可以防止新项目依赖该版本,同时允许所有现有的依赖该版本的项目继续运行。本质上,撤回意味着所有带有 Cargo.lock 的项目都不会损坏,并且未来生成的任何 Cargo.lock 文件都不会使用被撤回的版本。
Yanking a version prevents new projects from depending on that version while allowing all existing projects that depend on it to continue. Essentially, a yank means that all projects with a Cargo.lock will not break, and any future Cargo.lock files generated will not use the yanked version.
要撤回某个版本的 crate,请在之前发布的 crate 目录中运行 cargo yank 并指定你要撤回的版本。例如,如果我们发布了名为 guessing_game 的 crate 的 1.0.1 版本并想要撤回它,那么我们将在 guessing_game 的项目目录中运行以下命令:
To yank a version of a crate, in the directory of the crate that you’ve
previously published, run cargo yank and specify which version you want to
yank. For example, if we’ve published a crate named guessing_game version
1.0.1 and we want to yank it, then we’d run the following in the project
directory for guessing_game:
$ cargo yank --vers 1.0.1
    Updating crates.io index
        Yank guessing_game@1.0.1
通过在命令中添加 --undo,你还可以取消撤回,并允许项目再次开始依赖该版本:
By adding --undo to the command, you can also undo a yank and allow projects
to start depending on a version again:
$ cargo yank --vers 1.0.1 --undo
    Updating crates.io index
      Unyank guessing_game@1.0.1
撤回 不会 删除任何代码。例如,它无法删除意外上传的秘密信息。如果发生了这种情况,你必须立即重置这些秘密信息。
A yank does not delete any code. It cannot, for example, delete accidentally uploaded secrets. If that happens, you must reset those secrets immediately.